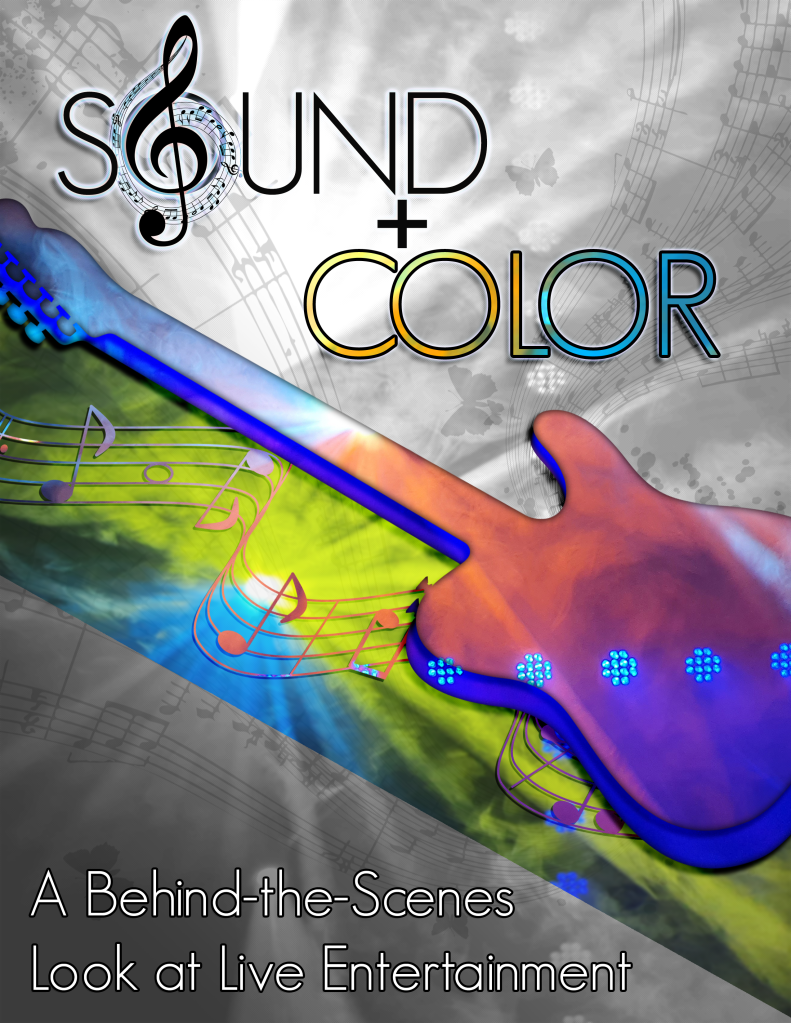
This week, I focused on my very last assignment for COM 561! As always, my vision with this blog is to provide you with a behind the scenes look at live entertainment. For this assignment, I decided to go full-circle by referencing my first finished product for the class, the Graphic Design/Photoshop module.
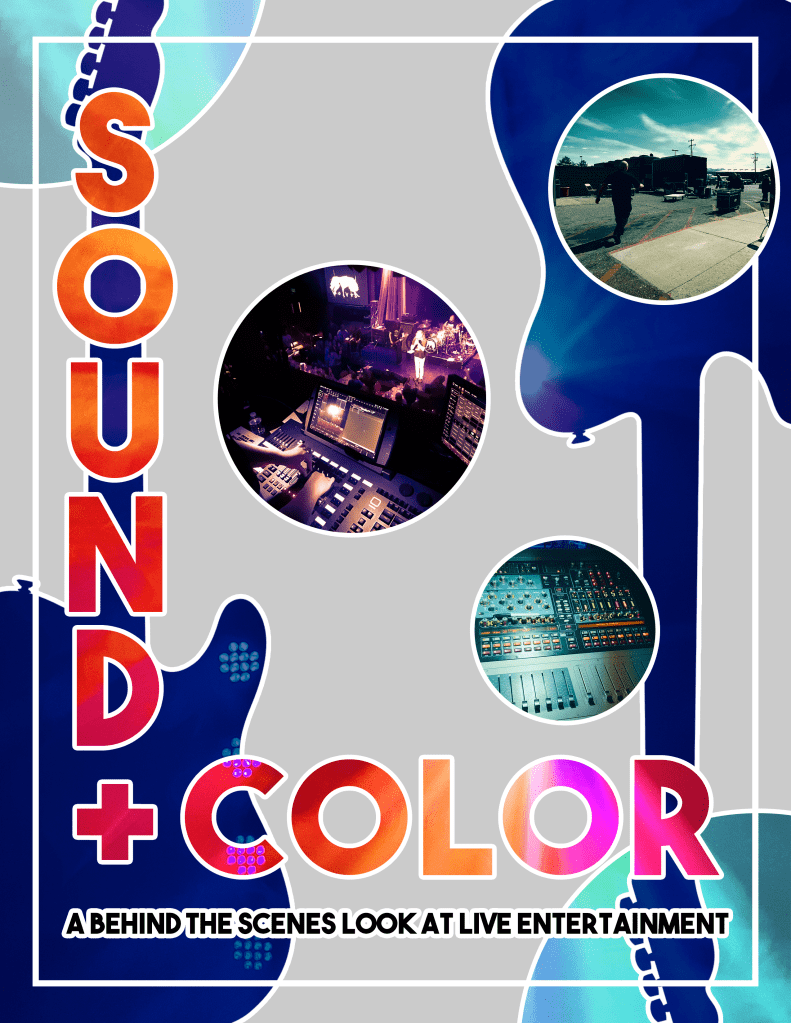
While I really like the first poster, I chose to make an alternate version of my Sound and Color poster for several reasons. Even though I have years of Photoshop experience, I like to try new designs. Also, I wanted to make a more modern minimalist poster design that could encompass both resources from my video project and the frenetic energy of live entertainment. I still used the guitar vector from my original project because I love guitars and felt the the guitar element would help tie the two posters together thematically.
The Project Reflection poster is a brand new take on the elements I’ve used throughout the semester. I used photos of the lighting rig at the Gala Showroom, then applied them via clipping masks to the title text layers, the guitars, and the circle elements. I then exported still frames from my video project. I varied the sizing and placement of those images, then applied circular clipping masks. Afterwards, I color graded all of the images by using adjustment layers. Finally, I added white stroke elements for visual interest and design cohesion.
This poster turned out very different from the original! I could see either of these posters serving as a print-style band flyer.
Thank you for following my COM 561 journey!
All images used in this project were my own, except for the guitar, found here:
Hello Everyone, I’m back with my final video and assignment for COM 561. As with all of my projects this semester, my goal is to give you a behind-the-scenes look at live entertainment. I did so this time by filming the setup (and some of the performance!) of Candlebox’s March 31 show – with everyone’s permission, of course.
I followed a series of shots listed in a hand-drawn storyboard. I wanted something simple to carry with me to remind me of what shots I needed to get during my busy workday. I came into the Gala Showroom to shoot footage on breaks from my work in marketing. Plus, I got some extra interview footage and other B-Roll to possibly use for the project. Later, I ran the light board for the show in the sound booth above the stage. Candlebox ran their own sound from a booth on the showroom floor, so there was not much sound to showcase for this video.
The funny thing about the day was that I forgot to bring my tripod. Jackpot, Nevada is an hour away from Twin Falls, Idaho, so there was no chance of grabbing it once I left home. I had to shoot with the steadiest hand possible because I only had one chance to get it right!
I knew that I wanted to make a strong establishing shot with the load in footage, so I propped my hand up against the warehouse door and started filming everyone coming in with the gear boxes during load in. I was also able to get some shots of sound setup from the stage, and the power switches that turn on the lighting rig. From there, I got some shots of the booth itself, capturing both the sound board section and the light board and video switcher section.
I didn’t record the sound check out of privacy and respect for the band. Honestly, I didn’t even ask because recording anything during sound check is generally considered impolite in the entertainment world unless you have permissions set up well in advance. I did talk to the band about recording the show so that I could showcase the light work, and they were totally fine with that. In the revision from my draft, I added different shots of the show.
Some time later, I started the editing process for my raw footage. The process was fairly simple. I imported my clips in Premiere, found a free-to-use music bed from Pixabay, and started trimming down the clips into storyboard shots for the rough edit. I then added video/audio transitions and spaces for text (which would be added later in After Effects). Afterwards, I color graded the videos to suit my taste and to compliment the overall look of the footage.
For the revision from the draft, I added about 1 minute of extra footage from an interview with the main audio technician for the Gala Showroom (also known as my former boss!). I wanted to show the audience the philosophy and motivation that goes into being an entertainment technician, and I feel like I put the best sections of the original 7 minute interview into the final video.
Following feedback and suggestions, I also adjusted the audio transitions between sections of the video and added more text descriptions of locations and actions.
Like the original draft, I rendered that base draft out of Premiere, then brought it into After Effects to add titles and text effects. I used to work in motion graphics and can comfortably animate in AE compared to Premiere’s clunky title system. Once I was happy with the look, I exported the finished draft in Adobe Media Encoder as an MP4 and uploaded it to Youtube.
For this post, I’ve also added a new, revised storyboard in PDF format.
If you are reading this, thank you for following along with my coursework for COM 561! It was a great bit of fun and I loved presenting my passion for stagecraft with all of you.
Hello Everyone, It’s been a while! This week, I’m presenting you with my video story draft for COM 561. As with all of my projects this semester, my goal is to give you a behind the scenes look at live entertainment. I did so this time by filming the setup (and some of the performance!) of Candlebox’s March 31 show – with everyone’s permission, of course.
I followed a series of shots listed in the hand-drawn storyboard at the end of this post. I wanted something simple to carry with me to remind me of what shots I needed to get during my busy workday. I came into the Gala Showroom to shoot footage on breaks from my work in marketing. Later, I ran the light board for the show in the sound booth above the stage. Candlebox ran their own sound from a booth on the showroom floor, so there was not much sound to showcase for this video.
The funny thing about the day was that I forgot to bring my tripod. Jackpot, Nevada is an hour away from Twin Falls, Idaho, so there was no chance of grabbing it once I left home. I had to shoot with the steadiest hand possible because I only had one chance to get it right!
I knew that I wanted to make a strong establishing shot with the load in footage, so I propped my hand up against the warehouse door and started filming everyone coming in with the gear boxes during load in. I was also able to get some shots of sound setup from the stage, and the power switches that turn on the lighting rig. From there, I got some shots of the booth itself, capturing both the sound board section and the light board and video switcher section.
I didn’t record the sound check out of privacy and respect for the band. Honestly, I didn’t even ask because recording anything during sound check is generally considered impolite in the entertainment world unless you have permissions set up well in advance. I did talk to the band about recording the show so that I could showcase the light work, and they were totally fine with that. I have more footage from the show than I used in the video, but some of the clips contain recognizable copyrighted music and I was concerned that I wouldn’t be able to use them even though I’ve set my video permissions as “unlisted.”
I would be happy to add more of the light show footage with the professor’s permission, granted that YouTube doesn’t have any copyright issues with it.
Some time later, I started the editing process for my raw footage. The process was fairly simple. I imported my clips in Premiere, found a free-to-use music bed from Pixabay, and started trimming down the clips into storyboard shots for the rough edit. I then added video/audio transitions and spaces for text (which would be added later in After Effects). Afterwards, I color graded the videos to suit my taste and to compliment the overall look of the footage. I rendered that base draft out of Premiere, then brought it into After Effects to add titles and text effects. I used to work in motion graphics and can comfortably animate in AE compared to Premiere’s clunky title system. Once I was happy with the look, I exported the finished draft in Adobe Media Encoder as an MP4 and uploaded it to Youtube.
I’m looking forward to hearing your feedback on this one!
This assignment was challenging! As you may already know, the purpose of my blog is to give you all a behind-the-scenes look at live entertainment. This time, I was tasked to do so in audio story form.
As I spent several days pondering what I was going to do for this project, my number one challenge was how to capture the excitement of live entertainment without being able to use music recorded from a show. I debated doing another interview with Tad, the Entertainment and Events Manager at the Gala Showroom. However, I felt like that would be a bit more procedural and technical – yes, we could cover what we do during a show, but it wouldn’t capture the excitement!
When I think about working in live entertainment, I often think about my very first day on the job and how fun it was. From a young age, I was an avid concert-goer and I’ve always loved live music. When I was given the opportunity to get my foot in the door of the live entertainment industry, I jumped at the chance! It was like a dream come true, and I’ve had so many interesting experiences along the way, but I still think back to that very first day….
That’s when I decided that I wanted to take you with me back to my first day on the job! I wanted to focus on feelings and emotions rather than the complicated technical functions that go into everyday work as a live entertainment or AV (Audio Visual) technician. What better way to capture that excitement than going back to when everything was new?
Once I had my idea, I had to figure out how to execute it. I planned out some bullet points that I wanted to cover and sounds I wanted to capture, then I set out to record. I went to the Gala Showroom to record different ambient sounds, including the segment where I’m walking up the stairs. It was difficult to condense my story into a beginning, middle, and end, because I’m still a working technician! However, I did my best to stick to the high points of that first day at work and discuss how it motivated me to pick live entertainment as my work of choice. Even though I primarily work in the marketing profession, live entertainment is where my heart is, and that’s the day my journey started.
So far, this is the project for COM 561 that underwent the most drastic changes between the draft and the final. For the final, I incorporated much of the feedback I received (thank you everyone!) by adding musical elements and more ambient sounds. Plus, I re-recorded my entire voice over! My reasons for doing so included being dissatisfied with the draft voice over, where I had to record in different conditions and at different times. As an audio editor, I could clearly hear the difference in the clips, and I was sure others would be able to as well. As per the feedback, I was correct in that assumption. This would not do! I wanted a voice over that sounded consistent, clear, and enthusiastic throughout my story!
I went back to the beginning, choosing to transcribe the draft audio into a written document, crafting a different, more descriptive intro. Then, I recorded all of it in one take with my smartphone. I emailed the file to myself, uploaded it into my Audition project, then isolated the file to reduce noise and limit the audio levels to -3db. Prior to making more adjustments, I incorporated a music file I found on Freesound.org to serve as an intro and outro for my story. I adjusted the fade in/fade out for the file and lowered the volume considerably so it would not be drastically louder than the narration.
I still needed more ambient sound!
I chose to return to Freesound.org to find a good guitar solo and audience cheer for the part of the story where I discuss the excitement of live entertainment. I wanted to capture the “live music” feeling without overwhelming the narration. I adjusted the sound levels and fades accordingly.
I’m very happy with how my final audio story turned out and I hope you enjoy it as well! I’m including all links to the Freesound.org files at the end of this post:
This assignment was challenging! As you may already know, the purpose of my blog is to give you all a behind-the-scenes look at live entertainment. This time, I was tasked to do so in audio story form.
As I spent several days pondering what I was going to do for this project, my number one challenge was how to capture the excitement of live entertainment without being able to use music recorded from a show. I debated doing another interview with Tad, the Entertainment and Events Manager at the Gala Showroom. However, I felt like that would be a bit more procedural and technical – yes, we could cover what we do during a show, but it wouldn’t capture the excitement!
When I think about working in live entertainment, I often think about my very first day on the job and how fun it was. From a young age, I was an avid concert-goer and I’ve always loved live music. When I was given the opportunity to get my foot in the door of the live entertainment industry, I jumped at the chance! It was like a dream come true, and I’ve had so many interesting experiences along the way, but I still think back to that very first day….
That’s when I decided that I wanted to take you with me back to my first day on the job! I wanted to focus on feelings and emotions rather than the complicated technical functions that go into everyday work as a live entertainment or AV (Audio Visual) technician. What better way to capture that excitement than going back to when everything was new?
Once I had my idea, I had to figure out how to execute it. I planned out some bullet points that I wanted to cover and sounds I wanted to capture, then I set out to record. I went to the Gala Showroom to record different ambient sounds, including the segment where I’m walking up the stairs. So far, that is the only ambient sound used in my draft. I then recorded myself at home with my smartphone. It was difficult to condense my story into a beginning, middle, and end, because I’m still a working technician! However, I did my best to stick to the high points of that first day at work and discuss how it motivated me to pick live entertainment as my work of choice. Even though I primarily work in the marketing profession, live entertainment is where my heart is, and that’s the day my journey started.
So far, the editing process in Audition was pretty straightforward. I have my project saved as a multi-track project with my story narration file and the sound of me walking up the spiral staircase into the sound booth. In my final draft, I would love to add more ambient sound, and possibly some musical elements.
I look forward to your feedback on this project! It’s been a lot of fun so far.
Hello Everyone! For this week’s assignment, I worked in Adobe Illustrator to create the final logo for Sound + Color, which focuses on a behind-the-scenes look at live entertainment. I will cover my initial draft process, feedback, and revisions.
My first challenge with this assignment was how to convey both live sound and lighting in a static vector logo. I am a fan of minimalism, but I didn’t feel like it would apply well here. I wanted something punchy and sharp; a logo that could be bright and flashy like a loud rock show without being gaudy. I spent several days mulling over many design concepts, thinking about the scalability of the logo for future projects. I worked through different layouts, deciding three things:
1. I wanted the logo to be round. 2. I wanted to incorporate elements of an audio graphic equalizer (EQ), and…. 3. I wanted to include a spectrum of light to represent stage lighting.
Once I knew what direction I wanted to go in, I needed to locate tutorials and examples that could help me forge the design that started to form in my mind. However, you might be wondering how I came to those design decisions in the first place. My initial thoughts about having a round logo related to possibly making a logo in the shape of a vinyl record. Ultimately, I scrapped that idea because it didn’t incorporate the lighting aspects very well. I instead went with a round shape that simulated a stage light, emitting white light that splits into a prism. That prism element doubles as the sound element, as it is in the shape a rounded audio graphic EQ. The text on the logo represents the “old school vinyl” look I initially wanted to go in, and also functions as a “gobo” on the white “light.”
For reference to those unfamiliar, a gobo is a stencil-like wheel apparatus inside moving lights. If you’ve ever seen a cool pattern being emitted from the stage lighting during a show, you are watching a gobo in action.
Back to tutorials and examples! After scouring YouTube over a couple days, I was fortunate to find a video that covered a very similar design to what I had in mind. There was one catch though…. the video wasn’t in English! Luckily, I was still able to follow it well, and it gave me plenty of information to make the circular graphic EQ that I was thinking of. I’ll include a link to the video at the bottom of the post.
For the technical side of my design process, I started with one line with rounded corners, and duplicated it into several lines. I then erased sections to simulate EQ sound waves, doubled the section, erased more lines for pattern variance, and saved my selection as a pattern brush. After that, I drew a circle and applied the EQ pattern brush to create the radial EQ design on the outside of the logo. From there, I decided to apply a pastel spectrum of light, then I duplicated that section to apply a Gaussian blur and blending modes. This enabled a slight glowing effect to the radial EQ and helped simulate the glow of stage lighting, as if the prism was emanating straight from the white circle “light” portion.
I received two main pieces of feedback after I posted my initial draft:
1. There were sections of the radial graphic EQ that were overlapping each other, and…. 2. The pastel lettering was a bit difficult to read.
In the revisions stage, I adjusted the EQ pattern brush so that the radial lines would be truly equidistant to each other. This adjustment fixed the sections that were touching in the initial draft, but I had to create a new radial EQ for the logo. Moreover, I had to re-do the glowing effects after the brush adjustment, this time amplifying the glow compared to the previous draft. After viewing the new radial EQ, I decided to make it slightly brighter than the previous pastel EQ. I then added a thin stroke to the radial EQ to add depth and visual interest.
From there, the outside of the logo was complete, but the inner sections were still unfinished. This time, I changed the font color to a darker blue to make it more readable in response to the feedback I received. I then added the blue circles on top of the white circle background to tie together the EQ graphic. For the text, I decided to arc both sections to mimic the arc of the circle as a throwback to retro vinyl records and the aforementioned gobos. Lastly, I added a prism stroke to the text, tying it back into the shining spectrum in the radial EQ, and exported the logo to the PNG file format so that I could maintain background transparency.
Overall, I am very happy with how the logo turned out!
Hello Everyone! For this week’s assignment, I worked in Adobe Illustrator to create my logo for Sound + Color, which focuses on a behind-the-scenes look at live entertainment. While I have several years of experience working with Illustrator, I would not say that I have the same level of comfortability with it compared to Adobe Photoshop. This assignment required a lot of extra thought and preparation!
My first challenge with this assignment was how to convey both live sound and lighting in a static vector logo. I am a fan of minimalism, but I didn’t feel like it would apply well here. I wanted something punchy and sharp; a logo that could be bright and flashy like a loud rock show without being gaudy. I spent several days mulling over many design concepts, thinking about the scalability of the logo for future projects. I worked through different layouts, deciding three things:
1. I wanted the logo to be round. 2. I wanted to incorporate elements of an audio graphic equalizer (EQ), and…. 3. I wanted to include a spectrum of light to represent stage lighting.
Once I knew what direction I wanted to go in, I needed to locate tutorials and examples that could help me forge the design that started to form in my mind. However, you might be wondering how I came to those design decisions in the first place. My initial thoughts about having a round logo related to possibly making a logo in the shape of a vinyl record. Ultimately, I scrapped that idea because it didn’t incorporate the lighting aspects very well. I instead went with a round shape that simulated a stage light, emitting white light that splits into a prism. That prism element doubles as the sound element, as it is in the shape a rounded audio graphic EQ. The text on the logo represents the “old school vinyl” look I initially wanted to go in, and also functions as a “gobo” on the white “light.”
For reference to those unfamiliar, a gobo is a stencil-like wheel apparatus inside moving lights. If you’ve ever seen a cool pattern being emitted from the stage lighting during a show, you are watching a gobo in action.
Back to tutorials and examples! After scouring YouTube over a couple days, I was fortunate to find a video that covered a very similar design to what I had in mind. There was one catch though…. the video wasn’t in English! Luckily, I was still able to follow it well, and it gave me plenty of information to make the circular graphic EQ that I was thinking of. I’ll include a link to the video at the bottom of the post.
For the technical side of my design process, I started with one line with rounded corners, and duplicated it into several lines equidistant to each other. I then erased sections to simulate EQ sound waves, doubled the section, erased more lines for pattern variance, and saved my selection as a pattern brush. After that, I drew a circle and applied the EQ pattern brush to create the radial EQ design on the outside of the logo. From there, I decided to apply a pastel spectrum of light, then I duplicated that section to apply a gaussian blur and blending modes. This enabled a slight glowing effect to the radial EQ and helped simulate the glow of stage lighting, as if the prism was emanating straight from the white circle “light” portion.
From there, the outside of the logo was complete, but the inner sections were still unfinished. I added the green circles to tie together the EQ graphic and create visual interest, then finally created the white circle, sending it to the back. The last element to add was the text, and I decided to arc the text to mimic the arc of the circle as a throwback to retro vinyl records and the aforementioned gobos. Lastly, I added a prism stroke to the text, tying it back into the shining spectrum in the radial EQ, and exported the logo to the PNG file format so that I could maintain background transparency.
Overall, I was not sure exactly what to expect going through this particular design process, but I am happy with how the logo turned out. I’m looking forward to your input!